After giving this some thought and talking with the family (more than I have been about this for the last few weeks), I think we are looking at well under $2000 in costs. More likely in the $1600 range. It would be $1400 but I am looking to have a backup controller.
With selling off old equipment (2 LOR residential units and a mp3 director), that should take a decent chunk out of the total. Add on dumping all the incan and led strings for maybe $1 each to locals and I think the net cost would be just over $1000.
So, with all that said, I ordered 2 Falcon F16v2 Pixel Controllers w/ mounting plates for about $425 and we are “doing this”!
Off to read more forums and wait for the holidaycoro pre-sale to pick up most of the other stuff!
I told my wife thanks tonight, for purchasing the item I had been looking at for many months now. She said “you are welcome” and asked what I just bought myself.
Truth is that I had been looking at the last version for many months to use in several projects but never cared enough to pull the trigger. In most cases, I found an alternate solution to handle the task at hand or realized I just didn’t care that much about the task to spend time playing with the Pi.
Now that I am moving away from LOR and my MP3 show director, I have no desire to go back to using a pc or laptop to run shows. I did that my first year and honestly it was a pain because I had moments where I wanted to use the laptop but was tethered to the FM transmitter and the 1st controller. Plus, I can swap sd cards and use it for other stuff the rest of the year.
So, with no further delay… I picked up a complete starter kit on amazon and it will be here in 2 days thanks to prime. If you want to take a look, here is the link for it on Amazon.
I have used my shopping list to order $565.11 worth of items from holidaycoro.com. This is their pre-sale #1 that should be shipping out in February.
I picked up:
- Pixel strips for the arches (5 meters each, to be cut in 1/2, so 3 for 6 arches)
- Two 350w 12v power supplies (with cords)
- 25 pixnode stripes (so I have some extra for splicing and playing)
- 2 enclosures, one for inside and one for outside
- A ton of waterproof connectors (although I needed 20 of one type and they only had 19 left)
- Only 10 sets of bullet pixels (I waited too long and the square nodes for the megatree sold out… gotta wait for another presale)
- 200 feet of 3 conductor cable (checked on amazon and didn’t really see a better deal) – although I may not need it with the rolls of SPT1 i have in the garage.
- Waterproof labels, 2 sets, because why not…
- EasyPix Controller – was unplanned but I thought it would be nice to have a quick way to test pixels without firing up more stuff on the bench and I saw someone else mention using it for this purpose.
I was trying to get this order in a quickly as possible before something else ran out of stock (like the waterproof connectors and the square pixels). I will have to wait for the next presale to grab more pixels and the tree topper stuff.
Time for the second pre-sale purchase from Holidaycoro.com. I was looking to pick up remaining items for the megatree as I missed out on the square pixels during the last pre-sale. I also needed a topper mounting system and some strain relief clips for the PixNode strips that will be possibly anchored to the ground with huge nails. Not sure if I will use it, but I also grabbed a center post load spreader, although I will likely drill through the middle and drive a piece of rebar down to stop any movement if it lifts at all.
Order is below:
Continue reading More pre-sale from holidaycoro →
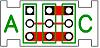 I will first say that I apparently missed the original Jon (jchuchla) group buy on diychristmas.org, probably because I didn’t know I would be going rgb in 2016. The original thread discussing the item can be found here and it will explain that it is a tiny PCB used to splice or power tap/inject. They come in a panel of 50 for $5!
So what would I use it for and do I need it? That is a tough question honestly and for the price I do not really care, if I can come up with at least one possible use. Luckily, I do not think it is that difficult to realize that if I have a pixel go out, I have to perform some minor surgery where I cut it out and splice in a good one by using a bunch of solder and heat shrink. Why a bunch of heat shrink? Well, to make sure the wires do not touch and cause fuses to pop or fires to start… although I do like a good fire when it is cold.
Continue reading Pixel Splice/Tap, why not? →
Another group buy that i find interesting? Thank you ma’am, may I have another?
 This time the group buy is for a device that I am not actually sure how much use I would get… a buffer/line driver from RobG on diychristmas.org, along with other items (flood drivers). I have heard that with the right wire setup on the Falcon F16v2, some pretty long distances can be had to the first pixel. Fair notice, there are other boards like this (uAmp for example) that do something similar.
The premise is pretty basic. If you run your data too long before your first pixel, the signal degrades (drops voltage) and stuff doesn’t work. You may ask why just the first pixel? That is because each
pixel repeats the data down the line to the next. Without any devices like this in a long run, people can resort to just splicing in a normal pixel to act as a repeater (referred to as a null pixel). Obviously you would not want that lighting up so you can just make sure it is excluded in sequencing or you can set this up in the controller (if supported, which most are now) by telling the controller the first pixel is a null and it will leave it off. So this board is a tiny guy that you would use in place of a null pixel and the board will use the incoming power to boost the data headed down the line. A quick solder and heat shrink, done.
Continue reading Buffer/line driver board group buy? →
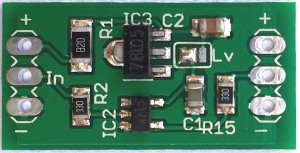
Well, I didn’t miss this falcon christmas forum group buy from Andy (harrison0550) before it ended, so that is certainly good news. In fact, this is going to be running until Feb 21st and has already gone over the 500 board break point to drop each unit by $0.50. This still means $11.50 per assembled board, but this would be one of those times where spending some cash can save hassle and time down the road. I have always believed in spending the cash to have the right tool for the job as trying to open a paint can with a hammer can be messy!
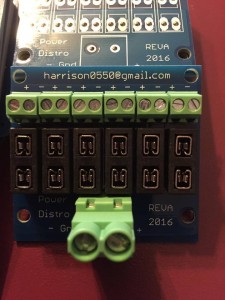 As you can see it is a single power input board with 6 fused outputs. Most people might say… “why don’t I just run my own wire and save the money?” In my opinion it would depend on how far away the psu is from the points you have to power inject. If you have a ways to go (like the top of a megatree), wouldn’t you rather run one pair of wires up instead of 6 pairs? I would, especially if I am looking at injection numbers that would require more than one of these boards. I think the same would apply to running across the yard to a location where you have several elements but no good place to put a larger psu.
Continue reading Power Distro Board, yes please! →
A journey into sight and sound (with RGB now)